This week is further development of my previs project. I am aware there is not much time left on this project at all, so I really need to work on updating certain scenes for better cohesion, and I think adding placeholders for effects like bullets will make the intention of particular cuts clearer. At this point, I am accepting that there will be many parts to this previs that are not polished to the degree I would like, but I think overall I have learnt a lot, which I think is very valuable.
Advanced Animation 8: Layout adjustment
Because I have started my previs project nearly from scratch means I’ll lose valuable time that I had intended to use for the polish stage of my final outcome. While it’s disappointing to have less time for refining I’m committed to ensuring the foundation is solid. This step back now will pave the way for a more cohesive and functional project, even if it means sacrificing some polish later. As a result, I mostly spent this week reflecting on what was not working on my previous layout, and reusing as much of the animation as possible in separate scenes, playblasting each cut separately so I could put it together in Capcut. This is a much faster workflow in general, but since I’m doing this so late in the project I am worried about being extremely behind.
Advanced Animation 7: Reflection and Workflow adjustment
Recently, I encountered significant difficulties with the rigs I had chosen for my previs. Despite my best efforts, I experienced a lot of gimbal locks and problems animating as quickly as I needed to to get my concepts across, as well as making the mistake of trying to animate each shot in one scene, which I’ve now realised is a nightmare if I need to change timing. After careful consideration, I’ve decided to start the process of collating all my scenes in a video editor. This decision, though challenging, will ultimately lead to a more streamlined outcome, and has taught me how I should proceed with projects like this in the future.
Advanced Animation 6: Clarifying Key Shots
After further development of my storyboard, I am aiming to improve the timing of my shots and make the clarity of my scenes better. I am finding through this project that though I am fairly used to animating cycles, I am not used to choreographing or staging shots, and this is the most challenging aspect of this project. On reflection, this is evidence that I need to practice with more projects like this because these are skills I urgently want to develop.
Advanced Animation 5: Blocking
I have translated an extremely rough version of my storyboard into blocking in Maya. Utilising my worldbuilding, I’m hoping to convey the main beats of my story through the previs, intending to develop it further in my final major project. I Struggle with timing out shots, so I think developing such a long project in this module will be extremely key to helping me develop that skill. I need to add further detail to the blocking before I can convert it to spline and polish, so that is my next step.
Posted in Uncategorised
Leave a comment
Advanced Animation 4: Translating Storyboards
I have decided to use the Azri and Psylocke rigs in my previs since I think they can represent the worldbuilding I developed while planning this project. I’ve outlined these characters here, with references to other media that I have taken inspiration from:
Psylocke:
Personality: Abrasive, uninterested, cheeky, arrogant, slightly manic, deceitful, intelligent
Combat: Slippery, evasive, fast, dual-wield guns, acrobatic
Animation inspiration:
Rikku (FFX)
Jinx (LoL, Arcane)
D.VA (Overwatch)
Azri:
Personality: Trusting, steadfast, noble, naive, “heroic”
Combat: Slow, heavy, powerful, straightforward, two-hand sword
Animation Inspiration:
Leona (LoL)
Brigitte (Overwatch)
Beidou (Genshin impact)

I have a wider interest in animation for games, as well as cinematic animation, so my main inspiration and focus for this project is outlining character archetypes that would be translatable into a game setting. I want to focus on greeting good action because I think that is most translatable after this project.
In the meantime, I have staged rough positions of my storyboard into Maya, to help me visualise the main beats of the animation, and I’m aiming to replace these with full rigs as soon as possible.
Advanced Animation 3: Final Storyboarding
This week I have developed the storyboard I would like to precede with in this project. As previously discussed, I have decided to pursue a more action-heavy story, since I think that if I decide to take this project forward into the FMP module, this would be a strong foundation for my showreel and future job applications. I’m slightly nervous about taking this project on, as I’m very inexperienced in this style of animation, but I am eager to develop the concept into 3D. From here, I need to complete an initial block out of my cameras without animation. I have decided which rigs I will use since I think they will fit well with the character archetypes I have so far imagined for my story.
Advanced Animation Week 2: World-building
Initially, I had been interested in developing the storyboard I had developed at the end of the last module, but considering my interests and aspirations outside of this degree, I think it might be a good idea to consider developing a project that is either more action or more games-focused. I have been working on other storyboards that expand more into this area. This ties into the discussions from today, which focus on worldbuilding, looking at how aspects of the world can inform and deepen the narrative. I will consider aspects such as:
– World Politics:
– Theology:
– Technology:
– Aesthetics:
And how these aspects can deepen the story’s development. I will likely not be using all of these aspects specifically in the story, but having an understanding of what these would be in the context of the narrative should help me develop a deeper and more developed story.
Advanced Animation 1: Mise-en-scene and The rule of thirds
Going into project one of this new module, We have been looking at mise-en-scene and camera direction. It is helpful to look at existing works and examine how scenes are visually composed.
I will need to think about where I’m placing characters, props and camera angles throughout the project, and how these decisions will affect the storytelling of my work. As an example, a character placed visually higher in a scene could imply authority or a cluttered bedroom could imply a disorganised personality. This also ties into the rule of thirds, which finds that our eyes are drawn to the focal points of a frame cut into thirds. Considering how I can tell my story visually will be important as I develop my characters and my world for this project.
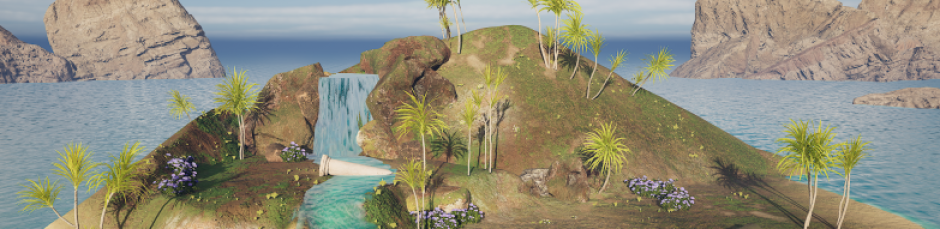
Final Outcomes- Unreal Island
I now feel that I have completed the final stages of the Unreal scene to the best of my ability within the time limit. I have animated and rendered out some camera shots of the island design project. I had to adjust levels of chromatic aberration and bloom in some of the shots because they were too strong, but overall I am extremely pleased with my outcomes and input into this project. Please view a collection of rendered scenes, as well as clips from the game-mode of this scene.
All in all, these were the stages I partook in for creating the design project.
- Initial concepts– as mentioned in the first week of this module, the initial stage of developing this scene was concepting. I initially had several different environment locations in mind, but after discussing with my team we decided on making an island environment.
- Concept art– Although we ended up moving away from our concept art due to time constraints, the concept art was an essential part of creating this project, since it aided my initial direction and first draft of a scene.
- Landscape sculpting- in both my initial draft of my scene and the level that became part of my final outcome, the first step was sculpting the landscape.
- Water Creation- Using Unreal’s inbuild water plugin, I created an ocean, lakes, rivers and a waterfall. This provided a clear sense of the land and what could go within it.
- Texturing the environment- after applying the water, I was able to use the material i created with an unreal material blueprint, using textures freely available from Quixel Bridge. I used sand materials to create a beach, grassy and rocky textures to create the village, and a dirt path to imply a route available to the player.
- Landscaping- Using Quixel Bridge, I added assets like rocks and foliage to the scene. Especially around the waterfall and water’s start, these rocks give essential context to the scene, such as where the water is originating from and where the water has flown to.
- Placing assets- I was able to use a really comprehensive free pack from the unreal asset store to create the environment. The pack included modular houses, props, some foliage and some included vfx particles. I used this pack to create the marketplace area, a small beach, a village, and the singular house on the hill. I was also able to use this pack to decorate each of these areas, adding produce and potions to the market stalls, barrels and wagons around the town and campfires and lanterns to produce some light. I also was provided with some assets from my teammates, such as the lamposts I was able to place around the island, and the large wooden bridge. Adding colliders to the bridge meant that the player was able to walk across it to reach the hilltop house.
- Animating assets- After placing assets, I was able to apply a simple animation to the windmills that made them turn. Even this small blueprint adds a lot of liveliness to the village environment overall. In a future project, I would really love to add more environment animation and would love to include some character animation for a unique character.
- Lighting- I added point lights to items such as lamps and campfires to add some realism to the scene. I also adjusted the directional lighting in the scene, making the scene look as though it was late afternoon or early morning. I also added emissive materials to props that would give off light, to add a glowing look to the assets.
- Particles- I created water particles for the waterfall, adding a more stylised texture and including collisions for the particles off of the rocks. This really makes the scene feel more alive since the elements of the scene have some interaction. I also created a particle for the bottom of the waterfall, which made it appear that the water particles splash upon impact. I felt that this really added to the environment overall. I also added emissive firefly particles that the player can walk through, adding another element of life to the scene.
- Scene effects- I added bloom, lens flares and chromatic aberration to the scene, to further stylise the visual appearance. I think these details add a good finishing touch to the scene.
- Camera animation- I animated some cameras with the sequencer, highlighting some of the elements of the scene.
- Rendering- I rendered out my animated cameras, adjusting the scene effects as necessary with post-processing.